Ersti-Stick-FAQ
You can pick up ready-made Ersti-Sticks with the Ersti-VM from the student council. In the first week of lectures, we also hand them out to first-year students.
The virtual machine (VM) gives you the opportunity to use a Linux system set up for your studies within your current operating system. Especially for Windows users, this may be easier at the beginning than setting up the programmes under Windows. macOS and Linux users can simply install the required software themselves; the use of the VM for these users is also possible, but not recommended by us.
The most important things in brief (WIP)
- version WiSe 2023, as of 10.10.2023 5 pm
- All Ersti-Stick data + manual: Download
- VirtualBox
- The VM only has 20 GB storage space. Here you can find a video tutorial on how to enlarge it.
I didn’t get a USB stick.
If you have not received a USB stick, you can also download the Ersti-VM above. Virtualisation software such as VirtualBox is also required for use.
The VM contains the open source operating system NixOS 23.05 and additional software so that you do not need to install any other programmes during your first year of study. If you wish to continue working with Linux afterwards, we recommend installing a Linux version alongside or instead of your current operating system. If you need help with this, you are welcome to drop by the student council.
What do I have to do to be able to use the VM?
The stick must be plugged into any USB port on the computer. The computer must have VirtualBox installed. Once you have started VirtualBox, go to File → Import Appliance and select the .ova file on the USB stick. Then click Next several times to import the VM. You should pay attention to how many resources (CPU/memory) are provided by yourself. We recommend releasing 50% of the RAM (probably 4096 MB) and 50% of the processors from the CPU (probably 4 cores). The more memory you make available, the more computing power is temporarily taken from your host system and made available to the VM. If you experience long delays during use, you should check your current utilisation and, if necessary, close applications in the host system (browser, etc.). The entire configuration takes approx. 2-5 minutes and you can start the VM by double-clicking.
The password of the VM is “hhu”. Guest additions are installed on the VM. That means that you can copy and paste between the PC and VM (and use a shared folder, among other things). Should this function be missing in your VM, we recommend reinstalling the guest additions via the menu. If you have problems setting up a shared folder, follow the following guide.
I’m getting an error message that hardware acceleration is not enabled.
VirtualBox requires VT-x/AMD-V to run the virtual machine. This function can be activated in the BIOS/EFI of the computer (unless your computer is very old, in which case it may not work). Depending on the computer, this works differently. If you get stuck, you can ask us for help.
How can I change the resolution?
Simply open the menu at the bottom left and type in “Display”. A window will then appear where you can select the appropriate resolution.
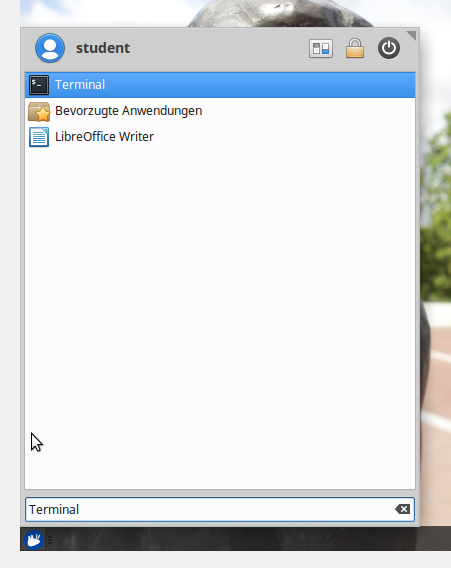
How do I open a terminal?
Simply open the menu at the bottom left and type “Terminal”. The key combination CTRL+ALT+T should also open the terminal. Another option is to press ALT+F2 and type “Terminal”.
The VM has no Internet
Unfortunately, VirtualBox currently has the error that the VM has no Internet if there was no Internet connection when the VM was started. To solve the problem without restarting the VM, right-click on the VirtualBox network icon (two computers) at the bottom right of the VM window, uncheck the box and then check the box again. Now the VM should have an internet connection.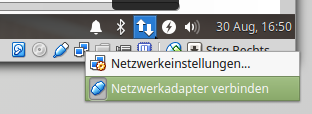
How to create a zip file?
In File Manager, select the files and folders to be zipped, right-click on a selected file or folder and select Create archive… → .zip.
Alternatively, you can also use the console to pack files and folders into a zip file. This can be done with the command zip -r filename.zip fileOrFolder1 fileOrFolder2 ....
Other questions
Concerning other problems, try Google or write us on Rocket.Chat. General information about (X)Ubuntu can also be found at https://wiki.ubuntuusers.de/ .
Not enough disk space
Here you can download a video showing how to enlarge the virtual hard drive.
Summarised:
- enlarge the virtual hard drive in VirtualBox
- install Gparted
- enlarge the hard drive with the free memory in Gparted
- enlarge the partition